Battle of Bennington
Battle of Bennington
The summer of 1777 burned hot with ambition for British General John Burgoyne. His grand campaign was finally underway.1 Burgoyne aimed to carve a path south from Canada, down the strategic highway of Lake Champlain and the Hudson River, all the way to Albany, New York.2 There, he expected to join forces with General Sir William Howe marching north from New York City, and Colonel Barry St. Leger driving east from Lake Ontario through the Mohawk Valley.1 This three-pronged pincer movement was designed to sever New England – the heart of the rebellion – from the rest of the colonies, strangling the American fight for independence.1 It was a bold plan, intended as the decisive blow.
At first, fortune seemed to favor Burgoyne. His army, a formidable mix of British regulars, German mercenaries, Canadians, and Indigenous allies, captured the vital American fortress of Fort Ticonderoga with almost shocking ease in early July.2 But the wilderness of upstate New York soon proved a more formidable opponent than anticipated. Burgoyne's advance south towards the Hudson River slowed to a crawl.5 American General Philip Schuyler skillfully employed delaying tactics. His men felled massive trees across the few rough tracks that passed for roads, destroyed bridges, and stripped the countryside bare, forcing the British to hack their way forward inch by painstaking inch.6 Burgoyne’s supply line, stretching precariously back to Canada, became dangerously overextended.6 His army, deep in hostile territory, began to hunger.
Word reached Burgoyne's camp near Fort Edward of a substantial American supply depot located in Bennington, Vermont.6 Intelligence suggested the depot was overflowing with horses, cattle, wagons, and food – precisely the resources his beleaguered army needed.6 Critically, Burgoyne was led to believe the depot was only lightly guarded, perhaps by fewer than 400 militia.8 This seemed like an opportunity too good to pass up.
He tasked Lieutenant Colonel Friedrich Baum, a German officer commanding Brunswick dragoons, with leading the expedition.6 Baum's orders, however, went beyond a simple supply run. Burgoyne envisioned a multi-purpose mission.84 First, Baum was to test the loyalty of the inhabitants and hoping to rally Loyalist support.84 Second, he was to disrupt American organization in the region.84 Third, a key military objective to seize enough horses to transform his dismounted German cavalrymen into an effective mounted force.8 Fourth, he was instructed to bolster the ranks of his loyalist troops with local recruits.84 Finally, and perhaps most pressingly, he was "to obtain large supplies of cattle, horses and carriages".6
These complex orders reveal much about Burgoyne's mindset and the flawed assumptions underpinning the raid. His belief in a lightly defended target and the expectation that Loyalists would flock to his banner reflected a persistent British overestimation of Loyalist sentiment throughout the war.24 Sending Baum on such a multifaceted mission suggests Burgoyne saw this not just as a raid, but potentially as a way to demoralize the region and perhaps even spark a Loyalist uprising.84 This gamble, based on faulty intelligence and wishful thinking about local support, placed Baum and his detachment in a perilous position, ill-prepared for the fierce resistance they were about to encounter.
Lieutenant Colonel Baum's command was a diverse, international force, numbering around 700 to 800 men in total: Germans, Regulars, Loyalists, Canadians, and Iroquois Indians.8
This mixed force, however, was poorly equipped for the task at hand. The Brunswick dragoons, the heart of the unit, were dismounted. They trudged through the summer heat and rough terrain clad in their heavy, traditional European cavalry uniforms – thick woolen coats, cumbersome tall boots, and heavy sabers designed for mounted combat.8 A primary objective of the mission was, in fact, to find horses for them.15 Their effectiveness was severely hampered by their inappropriate attire and lack of mounts. Furthermore, Baum himself, though a veteran of European wars, spoke little or no English, relying on French or translators to communicate with his British, Loyalist, and Canadian contingents, a significant problem during combat.84
The expedition departed from the British camp near Fort Miller around August 9th.8 Progress was slow, hampered by the terrain and the heavily equipped, dismounted dragoons.82 The element of surprise, vital for any raid, was quickly lost. Along the way, Baum's men skirmished with small American patrols, capturing prisoners who ominously revealed that a substantial militia force was gathering to oppose them.8 On August 14th, near Sancoick's Mill (now Cambridge, New York), Baum encountered a detachment of General Stark's militia sent out to investigate reports of Indigenous activity.25 Baum's troops pushed the Americans back after a brief fight.86 But the encounter confirmed his fears: he was facing not scattered resistance, but a formidable, organized enemy. Recognizing the danger, Baum halted his slow advance about four or five miles west of his objective, Bennington, near a bridge crossing the Walloomsac River in the colony of New York. He sent urgent messages back to Burgoyne, pleading for reinforcements.7
Faced with mounting evidence of strong opposition, Baum made the fateful decision to dig in and await reinforcements rather than retreat.7 While perhaps adhering to Burgoyne's instructions to hold his ground if met with resistance 84, this choice committed his unsuitable and increasingly vulnerable force to a defensive battle against a gathering storm of determined local militia.
Prudently, he chose to establish a defensive position on the high ground overlooking the river valley, a prominence that would later bear the name "Hessian Hill".6
Rather than concentrating his forces, however, Baum dispersed his detachment across several key points, likely hoping to cover multiple approaches and control the bridge.16 His main force, the dismounted Brunswick dragoons and the two small cannons, occupied a hastily constructed earthwork fortification – a redoubt – atop Hessian Hill.6 Across the Walloomsac River, on a lower rise of ground, he positioned Loyalists in another fortified position that became known as the "Tory Redoubt".16 Smaller detachments of Canadians, Indigenous allies, and possibly German light infantry were posted to guard the vital bridge over the river and other potential crossing points or paths.16
Meanwhile, news of Burgoyne's seemingly relentless advance down the Champlain Valley, coupled with the shocking loss of Fort Ticonderoga, sent waves of alarm across New England.86 The newly independent state of Vermont felt particularly threatened and sent out desperate pleas for help.87 Its neighbor, New Hampshire, responded decisively.87 The state commissioned John Stark, a seasoned veteran, as a Brigadier General to lead its militia.87
Stark was no ordinary militia commander. He had earned his spurs fighting during the French and Indian War and had distinguished himself in the early battles of the Revolution, including Bunker Hill, Trenton, and Princeton.87 Known for his fiery temper but respected for his hardened skill and courage, Stark commanded fierce loyalty from his men.87 He had recently resigned his commission in the Continental Army in disgust after being passed over for promotion by Congress.89 He agreed to lead the New Hampshire forces only on the condition that he operate independently, answering solely to New Hampshire authorities and not to the Continental Congress or its officers.90 His reputation was such that nearly 1,500 New Hampshire men – farmers and tradesmen – rallied to his banner within six days, some reportedly walking out of church services to enlist.87
Another crucial figure emerged from the Green Mountain State itself: Colonel Seth Warner.7 Warner, an early settler of Bennington and a leader of the Green Mountain Boys militia that had resisted New York's authority before the war, now commanded a regiment of Continental regulars.93 His regiment, composed largely of Vermonters, had recently fought a brutal but effective rear-guard action against pursuing British forces at the Battle of Hubbardton following the retreat from Ticonderoga.86 Though depleted, these were experienced soldiers. While the remnants of his regiment marched from their station near Manchester, Vermont, Warner rode ahead to join Stark, lending his experience and knowledge of the local terrain to the planning of the upcoming battle.93
Rounding out the American force were local militia units from Vermont itself and from neighboring Berkshire County in western Massachusetts.8 By the time the battle commenced, Stark commanded a formidable, if somewhat irregular, army of approximately 2,000 men.8 This rapid convergence of forces from three states, led by experienced and highly motivated commanders like Stark and Warner, created a much larger and more dangerous opponent than Burgoyne or Baum had ever anticipated. The stage was set for a major confrontation on August 15th.
Nature then intervened. Throughout August 15th, a torrential rainstorm lashed the valley.6 The downpour made any large-scale engagement impossible. Baum used the enforced pause to have his men improve their hastily dug fortifications, strengthening the redoubts on Hessian Hill and across the river.16 It granted Stark the time needed to devise a complex, coordinated assault, rather than rushing into a piecemeal attack. Simultaneously, it fatally delayed Breymann, ensuring that his reinforcements would arrive hours too late to aid Baum in his moment of greatest need. Had the skies remained clear, the Battle of Bennington might have unfolded very differently.
As the heavy rains finally subsided and the sun broke through on the afternoon of August 16th, General Stark set his plan in motion.6 It was audacious: a complex double envelopment designed to strike Baum's scattered positions simultaneously from multiple directions, overwhelming the defenders before they could consolidate or be reinforced.9 Stark divided his roughly 2,000 militia into several columns. Colonel Moses Nichols was tasked with leading a force of 200 New Hampshire men on a wide flanking march to strike the rear of the main Dragoon redoubt on Hessian Hill. Colonel Samuel Herrick, with 300 men swung even wider to assault the Tory redoubt from its rear, across the river. Other smaller detachments were assigned to attack the Loyalist and Canadian positions guarding the bridge and other approaches.16 Stark himself, with the largest contingent, would wait until the flanking attacks were underway, then launch a frontal assault against Hessian Hill.16
Before launching the attack, Stark pointed towards the enemy positions and declared, "There are your enemies, the Red Coats and the Tories. They are ours, or this night Molly Stark sleeps a widow!".7
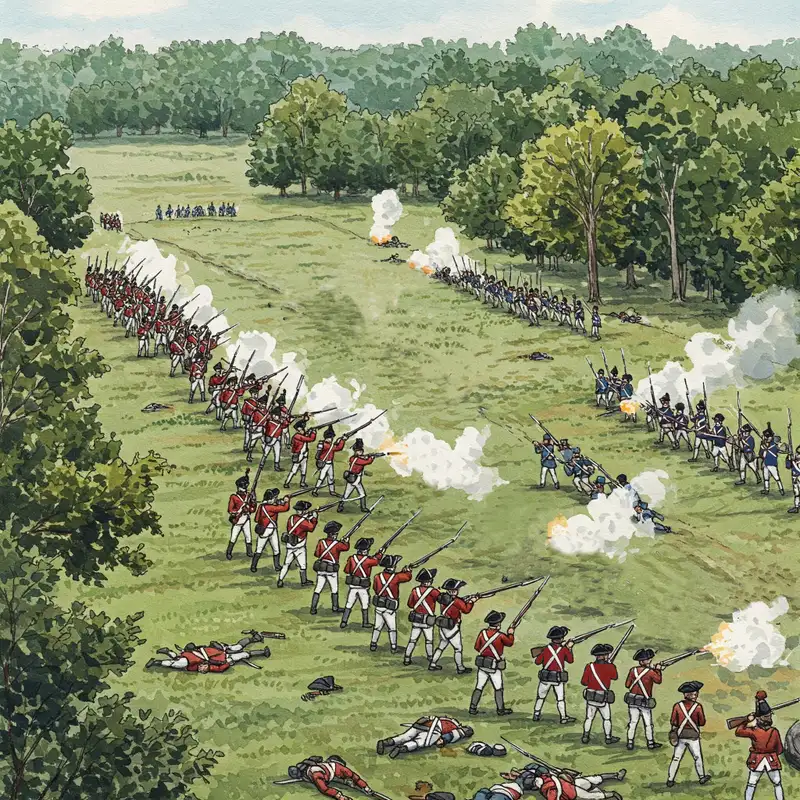
Around 3:00 PM, the American columns, moving stealthily through the woods and terrain, began their assault.82 The coordinated attacks hit Baum's defenses almost simultaneously, erupting in a cacophony of musket fire that Stark later described as "the hottest I ever saw in my life. It represented one continued clap of thunder".7
The fighting was vicious, often hand-to-hand.7 The Tory redoubt across the river, attacked from the rear by Herrick's men, collapsed relatively quickly.16 Many of the Loyalists and Indigenous allies, perhaps less prepared for a determined assault broke and fled into the surrounding woods.6
On Hessian Hill, the Brunswick dragoons, despite being dismounted and fighting in unfamiliar territory, put up a much stiffer resistance.6 Protected by their redoubt, they held their ground for nearly two hours against attacks from front and rear.9 But they were surrounded, outnumbered, and their ammunition began to run low.9 In a final act of desperation, Baum ordered his remaining dragoons to draw their heavy sabers and attempt to cut their way out on foot.8 The charge was futile, a tragic gesture against overwhelming odds.82 Baum himself fell, mortally wounded.6 With their commander down and their ammunition spent, the surviving German soldiers surrendered.9 The first phase of the battle was over; Baum's expeditionary force had been shattered.
Just as the echoes of the final volleys against Baum's dragoons faded, a new threat emerged from the west. Lieutenant Colonel Heinrich von Breymann's relief column, delayed by the previous day's rain and the difficult roads, finally arrived near the battlefield late in the afternoon.7 Breymann commanded a substantial force of roughly 550 to 650 fresh German troops – primarily grenadiers and light infantry, supported by two heavier 6-pounder cannons.8 He arrived, however, not to reinforce a successful raid, but onto a scene of chaos and defeat, with Baum's command utterly broken.6
Stark's American militia, victorious but disorganized, were in no condition to face this new challenge. They were scattered across the battlefield, tending to their wounded comrades, securing hundreds of prisoners, gathering captured weapons and supplies, and likely celebrating their hard-won triumph.93 Fatigue and the elation of victory left them vulnerable.
At this critical juncture, Colonel Seth Warner and his regiment of Green Mountain Boys arrived on the field.7 Numbering around 350 men, Warner's troops were Continental regulars, more disciplined and experienced than many of the militia, and crucially, they were relatively fresh.8 Warner, who had helped Stark plan the initial attack, now took effective command of this second engagement.93 He rallied the weary militia and skillfully deployed his own regiment to meet Breymann's advance.93
The battle flared anew as Breymann's Germans clashed with the combined force of Stark's militia and Warner's Continentals.7 The Americans initially fell back under the disciplined volleys of the German regulars before Warner's men stabilized the line.9 The fighting continued fiercely as daylight began to fade. Breymann's men fought hard, but they faced determined resistance. Reeling from the scale of Baum's defeat, uncertain of their enemy's true strength, and running low on ammunition Breymann ordered a retreat.7 The Americans pursued relentlessly, harassing the retreating Germans until darkness finally brought the long and bloody Battle of Bennington to a close.9
The Battle of Bennington, encompassing both engagements against Baum and Breymann, resulted in devastating losses for the British and their allies, and comparatively light casualties for the Americans. For General Burgoyne, the defeat was catastrophic not just in numbers, but in the type of soldiers lost.
The combined British, German, Loyalist, Canadian, and Indigenous forces suffered heavily. Approximately 207 were killed on the field.6 An astonishing 700 men were captured by the victorious Americans.6 While exact figures for the wounded are unclear, they were certainly significant. In total, Burgoyne lost nearly 1,000 men from this single failed expedition – a staggering blow to his already strained army.7
American losses, in stark contrast, were remarkably light. Reports indicate around 30 killed and 40 to 42 wounded, for a total of roughly 70 to 72 casualties.6
Beyond the sheer numbers, the nature of Burgoyne's losses was critical. A large proportion of the killed and captured were trained German regulars – the dismounted dragoons, grenadiers, and light infantry.6 These were professional soldiers, difficult, if not impossible, for Burgoyne to replace while isolated deep in American territory. He also lost a significant number of his Loyalist auxiliaries, who were either captured or dispersed, dashing hopes of substantial local support.6 Perhaps most damaging in the long run, the defeat shattered the confidence of his Indigenous allies. Most of them abandoned his army in the following days, depriving Burgoyne of his essential eyes and ears – the scouts crucial for reconnaissance in the dense wilderness.5 Bennington didn't just reduce Burgoyne's numbers; it crippled his army's capabilities.